Knowledge
Manual Zoom Lens for Precision Component Inspection
A manual zoom lens is the right instrument when magnification has to change but nothing else in the system is automated. Precision component inspection usually needs two very different views of the same part: a wide view that proves the part is the right one and is oriented correctly, and a narrow view that resolves a burr, a crack or a plating edge. A manual zoom lens covers both without changing lenses, without a motion controller and without software. This article works out when that trade is sound, what it costs in repeatability, and how to size the magnification from the part rather than from a catalogue.
Start from the feature, not from the magnification
The magnification a job needs is fixed by two numbers: the largest object that must fit in one view, and the smallest feature that must be judged. Field of view is sensor width divided by magnification, so the first number gives a maximum magnification. The second gives a minimum one, once you decide how many pixels a feature needs. Everything between those limits is usable, and if the two limits cross, the job needs two setups rather than a cleverer lens.
Take a connector housing 20 mm long with a 0.05 mm burr that has to be judged. Judging a burr reliably needs roughly three pixels across it, so sampling must be 0.017 mm per pixel or finer. On a 1920-pixel-wide camera that means a field of 1920 × 0.017 = 32 mm or less — which the wide view already satisfies. Now take a 0.01 mm plating crack: three pixels across it needs 0.0033 mm per pixel, so the field must be 6.4 mm or less. A 20 mm part cannot fit in a 6.4 mm field. That is not a lens fault; it is geometry, and the answer is two views.
What a manual zoom actually buys
Three things, and none of them is image quality. POMEAS manual and motorised variants in the same family share the same optical design: the 12.5× manual PMS-LZL-12101D and the motorised PMS-LZL-12104-D1 both run 0.58× to 7.5× at 77.4 ± 2 mm working distance on a 2/3-inch sensor. The difference is the mechanism, not the optics.
No control electronics. A manual lens needs no serial port, no driver, no recipe and no PLC handshake. On a bench where the camera is used for viewing and capture, that removes an entire integration step. It also means the lens works in a cabinet without power, in a repair vehicle, and in a cleanroom where adding a controller is a change-control problem.
Faster than a jog interface for occasional changes. An operator who changes magnification twice per part turns a ring in under a second. Driving a motorised lens to the same position through software takes longer and requires the software to be open.
Lower cost at the same optical specification. A manual lens is cheaper than its motorised sibling, which matters when several benches each need their own optics rather than one shared automated station.
What it costs: repeatability and recordability
A manual lens has a scale, not an encoder. Two operators setting "about 3×" will not land on the same magnification, and neither will the same operator on two occasions. For visual judgement that is irrelevant. For anything that produces a number, it is decisive: a measurement made at an uncertain magnification cannot be converted to millimetres at all, and a measurement made at an unrecorded magnification cannot be reproduced.
This is the same distinction that separates detented from continuous zoom. A detented lens clicks into defined positions, so the magnification is at least identifiable after the fact; a continuous ring gives finer control but no repeatable reference. The difference and its consequences for measurement are set out in what is detent magnification. Where a number has to be traceable, a motorised lens with position feedback is the honest choice, as described in motorised zoom lens repeatability.
Sizing table for common precision parts
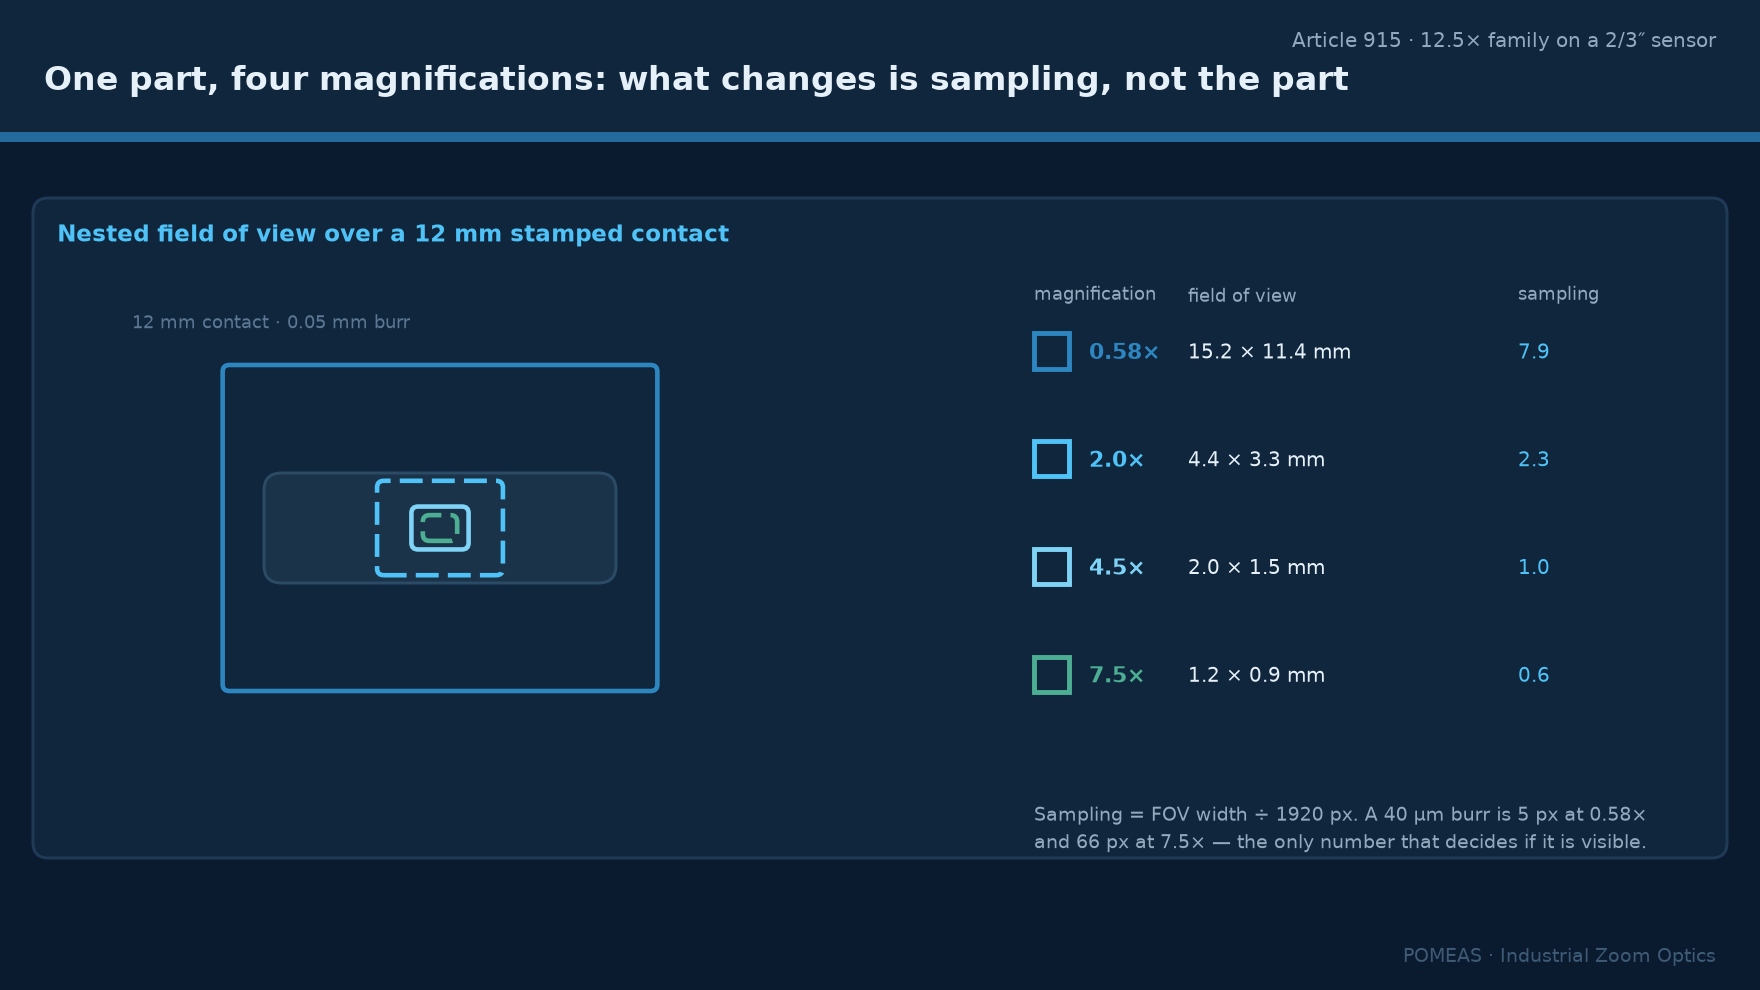
The table assumes a 2/3-inch sensor, 8.8 × 6.6 mm, and a 1920-pixel-wide camera, and uses the magnification ranges of the POMEAS 6.5×, 12.5× and 14× families. Fields are calculated, not measured.
| Part / feature | Wide view needed | Detail view needed | Magnification that covers both |
|---|---|---|---|
| Stamped contact, 12 mm, 0.05 mm burr | 14 mm → 0.63× | 0.017 mm/px → 32 mm, wide view binds | 0.58× (12.5× family) or 0.68× (4K, 1″) |
| Moulded gear, 8 mm, 0.02 mm flash | 9 mm → 0.98× | 0.0067 mm/px → 12.8 mm, wide view binds | 1.0× |
| Plating edge on a 4 mm pin, 0.02 mm | 5 mm → 1.76× | 0.0067 mm/px → 12.8 mm, wide view binds | 1.8× to 2.0× |
| 0.3 mm bond wire loop, 0.01 mm | 1.5 mm → 5.9× | 0.0033 mm/px → 6.4 mm, wide view binds | 6.0× |
| Die edge, 0.1 mm feature | 1.2 mm → 7.3× | 0.0007 mm/px → 1.3 mm, wide view binds | 7.0× to 7.5× |
The last two rows are where a 12.5× family runs out and a 14× family earns its place: the POMEAS 14× series reaches 0.55× to 7.6× with 2.80 µm optical resolution at 5× and above, giving 1.26 × 0.95 mm of field on a 2/3-inch sensor at 7×. The selection logic behind that range is covered in 12.5× zoom lens models and controls.
The optical consequence of a zoom range
A zoom lens is not equally good across its range. Numerical aperture changes with magnification, so both resolution and depth of field change as the ring turns. In the POMEAS 12.5× motorised series the published NA rises from 0.025 at 0.58× to 0.11 at 5× and above, while depth of field falls from 2.75 mm to 0.056 mm over the same span. Resolution improves from 13 µm to 3.05 µm. Two practical consequences follow: the low-magnification end is the comfortable one for finding and orienting a part, and the high-magnification end is the one that needs a flat, supported surface and stable illumination.
Field curvature and distortion also change with zoom position, which is why a zoom lens should be checked at the magnification it will actually be used at rather than at one convenient setting. TV distortion in that same series stays between 0.001 percent and 0.050 percent across the range, which is low enough that it does not drive a 2D dimension budget at moderate magnification.
Illumination is not optional at high magnification
At 5× and above, the illuminated area is a few millimetres across and a ring light at working distance produces a bright centre with dim edges. Coaxial illumination solves this for reflective, flat parts and is the reason the 12.5× and 14× families offer coaxial variants. For a part with height, coaxial light fills the shadows that would otherwise show a burr, so the illumination choice follows the defect type rather than the lens. Low-magnification corner falloff is a separate failure mode, covered in industrial lens vignetting: three causes and fixes.
When manual is the wrong answer
Three situations rule it out. When the magnification has to appear in a record alongside a measurement, because a scale ring is not a position encoder. When a machine, not a person, changes magnification, because a manual ring has no interface to drive. And when the same part is inspected by several operators who must produce comparable images, because their magnification settings will drift apart. In those cases the motorised variant of the same optics is the correct choice, and the difference in cost buys traceability rather than image quality.
One more limit is worth stating plainly: a manual zoom lens does not make a dimension measurable. If the output is a number in millimetres with a tolerance, the instrument is a telecentric system or a measuring machine, not a zoom lens with a graticule.
Frequently asked questions
Is a manual zoom lens as sharp as a motorised one?
In the POMEAS range the manual and motorised variants of a family share the same optical design and the same published resolution, so image quality is equivalent. What differs is the mechanism that moves the lens groups and whether the position can be read back.
How do I know which magnification I am at?
Manual lenses carry a scale on the ring and, in detented versions, click into defined positions. Neither is an encoder: the scale tells you approximately where you are and the detent tells you which defined step you are on. For any calculation involving millimetres, use the detent position or a motorised lens with position feedback.
Can I use a manual zoom lens with an extension tube to go beyond 7.5×?
An extension tube increases magnification and shortens the effective working distance, and it also introduces vignetting and a focus shift that has to be corrected. It is a workable shop-floor trick but it changes the optical specification, so the resulting magnification should be measured rather than assumed.
Why is the image dimmer at high magnification?
The same light is spread over a smaller image area as magnification rises, and the effective f-number increases. In the POMEAS 12.5× series the f-number moves from 12.5 at 0.58× to about 31.7 at 7×, which is a reduction of roughly six times in light per unit area. Brighter illumination or a longer exposure compensates.
What is the practical difference between 6.5× and 12.5× for component work?
Range, not quality. The 6.5× family covers 0.7× to 4.5× at 87 mm working distance, which suits parts from about 20 mm down to 2 mm. The 12.5× family covers 0.58× to 7.5× at 77.4 mm, which reaches bond wires and die features. Choose by the smallest feature, then check the working distance suits the fixture.
Should I buy one 12.5× lens or two fixed lenses?
If the two magnifications you need are both inside the zoom range and you change between them often, one zoom lens is simpler: no remounting, no re-centring, no second camera port. If you need two widely separated magnifications with the best possible performance at each, two fixed lenses win on optical quality and lose on changeover time.

Subscribe to Our Newsletter
Simply enter your email to receive the latest news and insights from Pomeas. Stay connected with Pomeas and be the first to discover new innovations in optical excellence.