Knowledge
Why Does Image Brightness Change When You Zoom? Keeping Exposure Stable Across Magnification
In brief: when a zoom lens moves to a higher magnification, the same light source and the same scene produce a darker image — not because light disappeared, but because it is being spread over a larger image and, in many designs, the effective aperture is getting smaller at the same time. Brightness changing with magnification is normal physics, not a fault. What matters for a production line is whether the exposure is compensated in a controlled way, in a fixed order: light first, exposure time second, gain last.
The two levers behind the darkening
Two effects act together when magnification rises, and telling them apart is what makes the problem solvable.
Lever 1: the same photons over a bigger image. Higher magnification spreads the light collected from the object over a larger image area. Irradiance on the sensor — brightness per pixel — falls accordingly. This is pure geometry and happens even with a perfect lens.
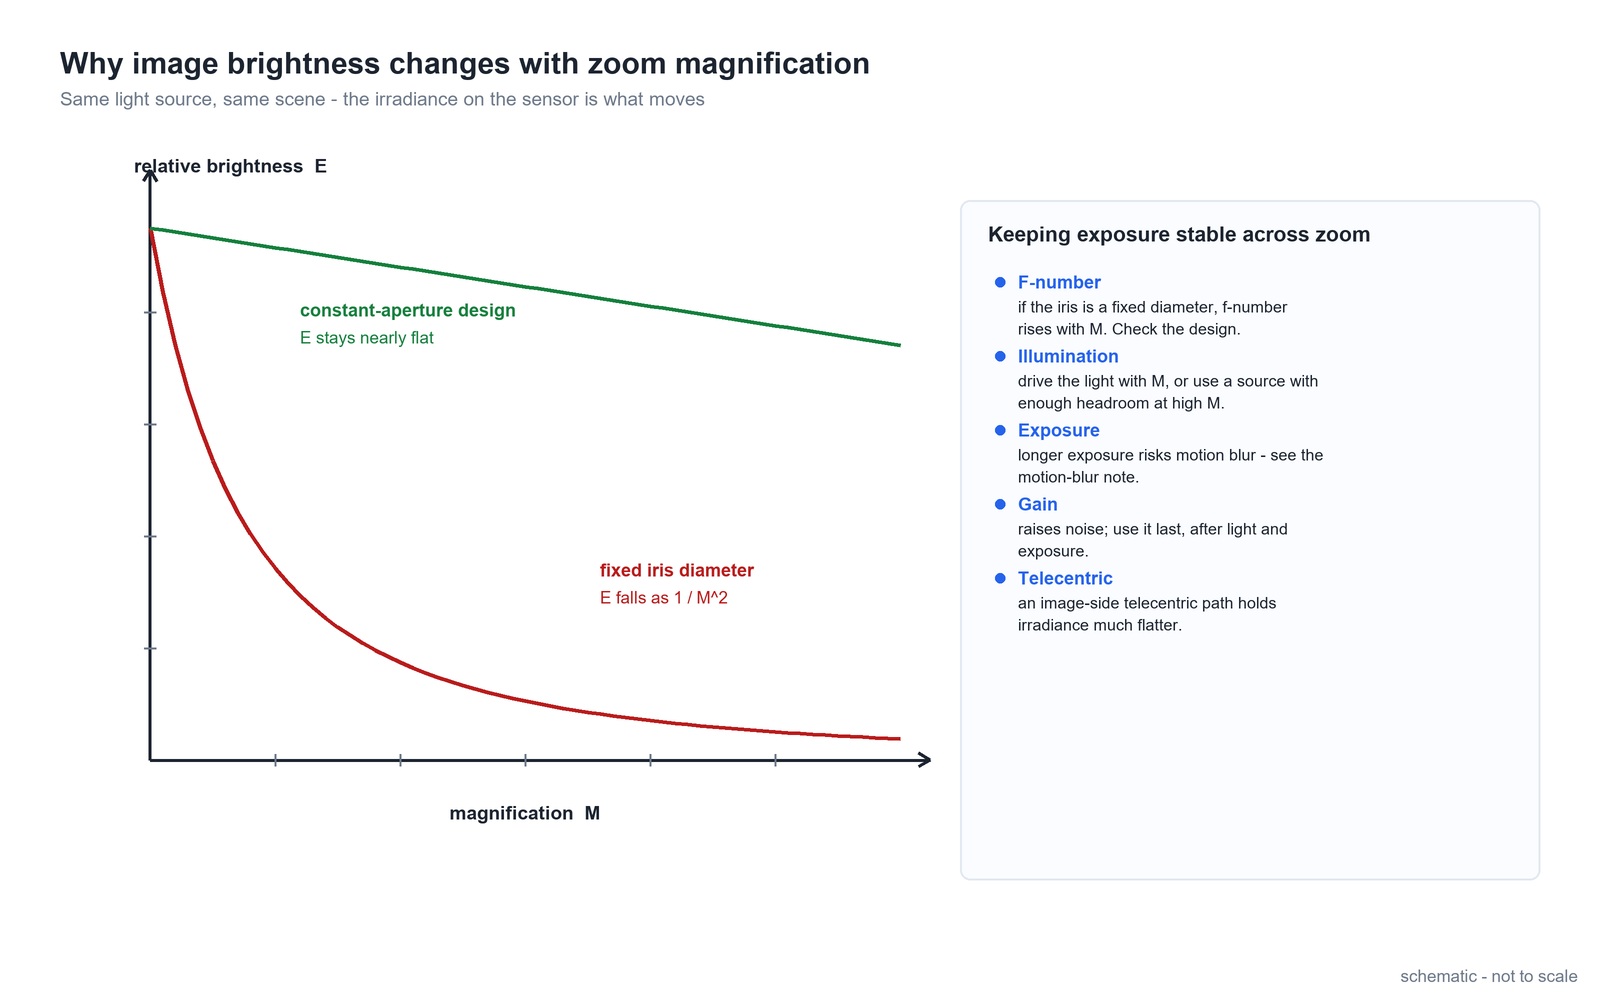
Lever 2: the effective aperture may be shrinking. The brightness of an image is governed by the f-number: irradiance scales inversely with the square of the f-number. If a zoom design keeps the physical iris diameter fixed while the focal length effectively grows, the f-number rises with magnification, and brightness falls roughly with the square of the magnification ratio. This is a design property, and it differs between lens families.
With a fixed iris diameter: relative brightness ≈ 1 / M² — engineering relation for orientation; the actual curve of a specific lens is set by its optical design.
What the two curves mean in practice
On a system with a fixed iris diameter, going from low to high magnification can darken the image dramatically — which is exactly the "it was fine at low zoom, now it's black" experience on the shop floor. On a design that holds its f-number across the range (a constant-aperture approach), the image stays nearly usable across the whole zoom, and the residual change is small enough to be handled by the light source.
Neither behaviour is wrong. But they demand different integration decisions: with a steeply falling curve, the illumination must have real headroom at the top of the range; with a flat curve, a modest light reserve is enough. This is why the zoom lens's brightness behaviour across its range belongs in the selection conversation, next to magnification, field of view and working distance — not after commissioning.
The compensation order: light, then time, then gain
When the image darkens at high magnification, there are four knobs, and they are not equivalent.
- Illumination first. Adding light costs no image quality: drive the source harder as magnification rises, or choose a source with enough reserve at the top of the zoom range. This is the only knob that adds signal without penalties.
- Exposure time second. A longer exposure collects more light for free — until the part moves. The trade-off is motion blur, which has its own arithmetic: blur length equals part speed times exposure time. For moving parts, this knob is bounded, and the bound is tight; see the motion blur and exposure time note.
- Aperture, carefully. Opening the iris admits more light but reduces depth of field — often the one thing a high-magnification inspection cannot spare. If depth of field is the constraint, this knob is effectively closed; see the depth of field note.
- Gain last. Raising gain amplifies the signal and the noise together. It rescues a marginal exposure but at the cost of contrast in the very features being inspected. Treat it as a fallback, not a setting.
Why the corner darkening is a different problem
Brightness falling with magnification is a centre-of-image phenomenon with a geometric cause. Corners going dark while the centre stays bright is a different failure — vignetting, where oblique light is clipped by the lens's own apertures, typically at the low-magnification end of a zoom. The two are often confused because both are "the image is darker than expected", but their fixes do not overlap: one is an exposure and illumination problem, the other is an optical matching problem. For the corner case, see the vignetting causes and fixes and the zoom-with-objective magnification and vignetting guide.
Making it stable, not just bright
For an automated station, the goal is not a bright image — it is a stable one, because every exposure change between parts of the same batch is a measurement variable. Three habits make zoom-dependent brightness a non-issue:
- Calibrate per magnification step. If the process uses defined zoom positions, give each one its own light-and-exposure recipe rather than one compromise setting.
- Keep the light off the exposure budget when possible. A source driven with headroom leaves exposure time short, which also protects against motion blur.
- Log the settings with the images. Magnification, illumination level and exposure in the same record make brightness drift traceable months later.
Frequently asked questions
Is it normal for the image to get darker at higher zoom magnification?
Yes. Higher magnification spreads the collected light over a larger image, and in designs with a fixed iris diameter the effective f-number also rises, so brightness falls roughly with the square of the magnification ratio. It is geometry and design, not a fault.
Why was brightness fine at low magnification but dark at high magnification?
Because the two effects compound: the larger image spreads the light, and a fixed iris becomes a relatively smaller aperture as magnification rises. If the illumination was sized for the low-magnification view, it has no reserve left at the top of the range.
Should I raise the camera gain to fix a dark image at high zoom?
Only as a last resort. Gain amplifies signal and noise together, reducing the contrast of the features being inspected. Increase illumination first, then exposure time within the motion-blur limit, and use gain to close a small remaining gap.
Do all zoom lenses dim the same way when magnifying?
No. The brightness curve across the zoom range is a design property: a constant-aperture design stays nearly flat, while a fixed-iris design falls steeply. It is worth asking for this behaviour when selecting a zoom lens for an automated station. For help matching a lens to your lighting budget, contact our team.
Related products
- Industrial lenses — zoom optics where brightness behaviour across the range is part of the design.
- Machine vision accessories — light sources and controllers sized with headroom for the top of the zoom range.
- Microscopes and surface profilers — integrated optical systems with illumination matched to their magnification range.

Subscribe to Our Newsletter
Simply enter your email to receive the latest news and insights from Pomeas. Stay connected with Pomeas and be the first to discover new innovations in optical excellence.


